|
|
|
|
|
|
| Notices |
ATTENTION NEW REGISTRANTS!!!Read THIS before registering! -------------------------------------
HAVEN'T BEEN HERE IN A WHILE?
Please check your email address and make sure it is up-to-date.
If you are on this list, you need to update. OR if you know someone on this list, please contact them and have them update.
THE LIST
Upon updating, please contact an Admin so we can remove you from the list.
Thanks.
|
|
|
 |
|
 |
|
 |
|
 |
|
Texture Building
by Vance Kovacs and Vera Milosavich, Black Isle
Studios/Interplay
|
|
|
|
General Info
-
To access the properties
panel(s) for objects, lights, and cameras,
use the control panel which is always at
the lower-left of the layout screen (Fig.
1): click the appropriate button [ A];
select the specific item from the pop-up
list [ B] for which to view
or edit properties; and click the "Item Properties" button
[ C] if the properties panel
is not already open.
|
Fig. 1: Control Panel
|
 |
- Specific objects [B] may also be directly
selected in the view pane or from the pop-up
list in the Properties panel. Items may also
be scrolled through using the arrow up/down
keys on your keyboard.
- Use the mouse buttons for changing position
and orientation of selected objects, lights,
or cameras:
- RMB to move on the Y axis
- LMB to move on the X & Z axis
- RMB to rotate around the Y axis (heading)
- LMB to rotate around the X & Z axis
(pitch & bank)
- All properties of any surface may be easily
copied to another surface by [1] selecting
the surface to copy in the Surface Editor panel
(ACTIONS tab Surface Editor),
[2] typing "C" (copy) on the keyboard,
[3] selecting the surface you want to
apply these settings to, and [4] typing "V" (paste).
Repeat as necessary.
- For General Property Settings, all
settings indicated are variable but underlined
settings should not be changed, generally speaking.
|
|
Basic Steps
Three main variables determine the quality of
your final texture map: [1] quality of
the texture model, [2] quality of the
color map, and [3] render quality.
- Create
the basic texture model in LightWave® Modeler.
- In a painting program, create
general color and bump maps (as needed)
for the texture model.
- Load the texture model into a LightWave® Layout scene
(select ACTIONS tab Add Add
Object Load Object. and locate the
object/model).
- Apply surface textures, colors, etc. (This
may also be done within LightWave® Modeler.)
- Add and adjust lights and one camera.
- Test-render the scene.
- Continue making adjustments to lights, surfaces,
etc., and doing test-renders until the results
are what you want.
- Do a final render of the scene to be saved
in .tga format.
- Using PhotoShop, offset and clean up the
final .tga texture as necessary for
tiling.
|
|
|
|
Applying
Basic Surface Properties
- Open the Surface Editor panel:
select ACTIONS tab Surface
Editor (Fig. 2).
- Select a surface to edit from Surface
Name list.
- Adjust the various surface properties
(except Bump).
Applying
Color Maps
- Open the Texture Editor-<select
Surface Name>-Color panel for
the selected surface by clicking the
[T] to the right of the Color setting
item (Fig. 2 & 3).
- If a surface color was specified in
the Surface Editor panel, set Layer
Opacity to less than 100% or the
color will not show (try 75%).
- Start with these general settings:
Projection = Planar
Image = <select/load a color
map>
Pixel Blending & Texture Antialiasing = <off>
Texture Axis = Z
Reference Object = (none)
World Coordinates = <off>
Other settings may be ignored for
now
- Click the Automatic Sizing button
to see how it affects your surface (it
may stretch it) and Adjust the Scale tab
settings (only X & Y) until tiling
is acceptable.
- After all settings are acceptable,
type "C" on the keyboard to copy these
settings for transferring to bump map
(see next step).
- Click the Use Texture button.
Applying
Bump Maps
- Open the Texture Editor-<select
Surface Name>-Bump panel for
selected surface by clicking the [T]
to the right of the Bump setting
item (Fig. 2).
- Type "V" on the keyboard to paste all
the previously copied color map settings
to this panel (Fig. 4). This is
important in order to keep the color
map and bump map coordinates aligned.
- Change only the Image setting
in this panel to a coordinating BUMP
MAP file.
- Other settings may be ignored for
now or procedurals may be
experimented with (select from Layer
Type setting) to further modify
the surface.
- Click the Use Texture button.
|
Fig.
2: Surface Editor

Fig. 3: Texture Editor - Color

Fig. 4: Texture Editor - Bump

|
|
|
|
- For texture building, spotlights are
usually best for most scene lighting
requirements.
- Additional lights may be added by selecting ACTIONS tab Add Add
Light Add <select
Light Type>
- A texture map scene generally uses
three lighting systems:
1. Key Light
- The dominant lighting in a scene.
- Position this light to the front and
above the object.
- Overshoot the object to avoid a harsh
spotlight edge.
- General Property Settings (Fig.
5):
- Current Light = <select
a light>
- Light Color = <try soft,
warm -- ivory>
- Light Intensity = 100%
- Intensity Falloff = Off
- Affect Diffuse/OpenGL = <both
on>
- Affect Specular/Caustics = <both
on>
- Lens Flare/Volumetric. = <both
off>
- Light Type = Spotlight
- Cone Angle = 30 degrees
- Soft Edge Angle = 15 degrees
(or about ½ of Cone Angle)
- Projection Image = (none)
- Shadow Type = Ray Trace
- Ignore all other settings
2. Fill Light
- The light that will simulate core
shadows, which, in real-life, are caused
by light reflected from adjacent surfaces.
- Position this light from below and
to the front of the object.
- Overshoot the object, as with key light.
- General Property Settings:
- Current Light = <select
a light>
- Light Color = < try muted,
cool -- medium blue>
- Light Intensity = 50% (or
about half of key light)
- All other settings are same
as Key Light
3. Ambient
Light
- The general lighting in a scene.
- It has its own settings panel -- click
the "Global Illumination" button in the Light
Properties panel (Fig. 5) of
any light to access the settings.
- General Property Settings (Fig.
6):
- Ambient Color = < try
saturated, warm -- reddish orange>
- Ambient Intensity = 5% (anything
less than 10%)
- Ignore all other settings
|
Fig.
5: Light Properties

Fig. 6: Global Illumination

|
|
|
|
|
Preliminary
Setup
Use the following General Property
Settings for your camera in a texture
map scene (Fig. 7):
- Current Camera = <select
a camera> (there is no need for multiple
cameras when building texture maps)
- Resolution = Custom (ignore;
this word automatically appears when
Width & Height are modified)
- Resolution Multiplier = 100%
- Width = 512 (preferred setting;
keep square, i.e., same as Height, below)
- Height = 512 (preferred setting;
keep square, i.e., same as Width, above)
- Pixel Aspect Ratio = 1.0
- Limited Region = <off>
- Zoom Factor (selected from pop-up
- do not use other items from list) =
50.0
- Aperture Height = 65 (or use
default)
- Antialiasing = Off (for quick
renders) or Low (for final renders)
- Soft Filter = <off>
- Adaptive Sampling = <on>
- Threshold = 0.1
- Ignore all other settings
Adjust placement of the camera 'view finder'
by getting inside the camera (5 on
number pad) and aligning the dotted vertical
lines with the finished edges of your texture
object.
After your surfaces, cameras, and lights
are properly set, you may do intermediate
and/or final test rendering of the scene.
|
Fig.
7: Camera Properties

|
|
|
|
|
Option Settings
Select ACTIONS tab > Render > Render
Options and use the following settings (Fig.
8a):
- Render First Frame/Last Frame/Frame
Step = all 1
- Auto Frame Advance = <off>
- Frame End Beep = <either>
- Show Rendering in Progress = <either> (<off> gives
quicker renders)
- Render Display = Image Viewer
- Enable VIPER = <either> (See "Rendering
Methods")
- Rendering tab
- Render Mode = Realistic
- Ray Trace Shadows = <on>
- Ray Trace Reflections and Refractions
= <off if not specified in the Surface
Editor >
- Extra Ray Trace Optimization = <off>
- Ray Recursion Limit = 16
- Output Files tab (Fig. 8b)
- Save RGB = <on>
- Type = Targa Format (.tga)
- RGB Files = <click and type
a file name>
- Output Filename Format = Name0001.xxx
- Ignore all other Render Options settings
Rendering
Methods
There are 3 rendering methods:
- Render Current Frame (F-9 on
keyboard or ACTIONS tab Render Render
Current Frame), for quick renders.
Be sure that Antialiasing in the Camera
Properties panel is set to OFF. Quick
rendering takes around a minute.
- Render Scene (F-10 on
keyboard or ACTIONS tab Render Render
Scene), for final renders. Be sure
that Antialiasing in the Camera Properties panel
is set to LOW. Final rendering takes
around five minutes.
- VIPER, for almost real-time
rendering of surfaces. To activate VIPER.
- Set the Enable VIPER setting
in the Render Options panel (Fig.
9)) to ON
- Click the VIPER button in
the Surface Editor panel (Fig.
2)
- Run an initial quick-render of
the scene (F-9 on keyboard)
- Click the Render button
in the VIPER panel
Now each time you make a change to the
scene, the VIPER panel will update
to reflect it. (Viper will not represent all rendered
elements, such as cast shadows, reflections,
etc.)
|
Fig.
8a: Render Options

Fig. 9: VIPER

Fig. 8b: Output Files

|
|
|
|
|
Basics Points
- Don't hesitate to use reference material.
- The goal to building textures in 3D
is to make them look like they weren't
built in 3D.
- Texture models need not be built clean nor single
mesh since they will merely be photographed. They
only need to look good.
- Begin by setting up a simple 2-D background
template at the proportions of your final
texture tile as a guide. For tiling
textures, this will normally be a perfect
square.
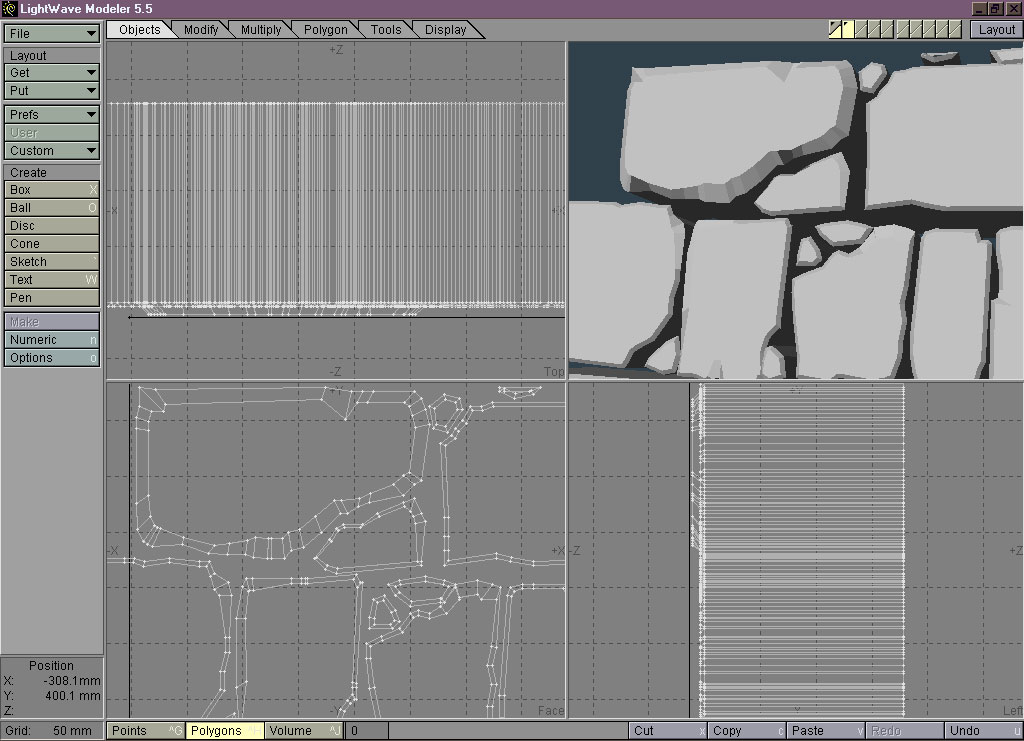
- For texture building, you will be building
primarily in the "Z" window.
|
|
 Create
the general texture pattern Create
the general texture pattern
- Try using the pen tool to create a
more natural looking pattern, creating
a separate polygon for each of the blocks.
- It may help to clean up the model at
this stage by merging points, tripling
all the surfaces, and then merging the
same surfaces.
- Flip any polygons that are still facing
the wrong way.
- Be sure that elements along the perimeter
will tile properly (see figure above). Duplicating
existing blocks from one edge and transferring
them to the opposite edge may help simplify
this. Remember that only those areas
that appear within the background template
area will be part of the "snapshot" of
your final rendered texture. (Additional
adjustments can be made when doing the
final image clean up in PhotoShop.)
|
|
 Add
dimension to the model Add
dimension to the model
Extrude the blocks to a reasonable depth
|
|
 Bevel
the main surfaces Bevel
the main surfaces
Bevel the front most surfaces of the stones
slightly to create an edge that can catch
light. This will only begin to add further
realism to the model.
|
|
 Tweak
the model Tweak
the model
Jitter or manually adjust points, especially
those at the edges of the bevel, to minimize
any unnatural uniformity and give a more "organic" look.
|
|
 Triple & subdivide Triple & subdivide
Subdividing will help make the surfaces
more irregular.
- Use Smooth for rough rocks
, brick, dirt..etc.
- Use Metaform for smoother rocks
such as pond stones
- Try a Smoothing Angle of 65°
Continue Tweaking
Think about creating cast shadows. Push
and pull the blocks to varying depths on
the "Z" axis. Select a few blocks and "stretch" them
along the "Z" axis to change the topology.
Assign surfaces to each individual
element
Assign a surface for every different
type of material (i.e., brick, stone, grout).
If all your blocks are the same material,
then create at least 3 to 4 different surfaces
of that material and assign them mainly
to non-adjacent blocks. This will be explained
further.
|
|
 Create
Grout Create
Grout
- Begin by creating a polygon with a
fairly dense mesh that will cover the
area to be covered by the grout.
- Use tools, such as the Magnet, to push
and pull the grout.
- Shape the Magnet tool to get different
effects.
- Also try pulling the grout through
the surfaces of some of the blocks to
get a "mud covered" look.
Finalize your
model
- Continue to fine-tune the model until
you are satisfied.
- Load your model into LightWave® Layout and follow
the steps previously outlined for
mapping surfaces, lighting the scene,
setting up the camera, and rendering.
- Note that if your Modeler file
contains multiple layers, each layer
will load as a separate object in LightWave® Layout so
you may want to first delete any unnecessary
layers from the file.
|
|
|
|
|
Creating
Color Maps
- Open Corel Painter.
- Create new document of 512 x 512 pixels,
or multiples thereof, and click OK.
- Select a paper texture surface.
- Create a color map/texture.
- Keep overall value of the color
map in medium range for flexibility
in lighting.
- Use the Watercolor tools
to create under-painting tones.
- Use the square chalk tool (Dry
Media tools) to pull out more
paper texture (remember to dry
the watercolor layer if lighter
chalk tones need to be seen).
- Try using Liquid or F/X tools
to distort areas.
- Experiment with other tools.
- Save the final color map in .tga format.
|
Fig. 10: Adjust
Color [Painter]
|
 |
| |
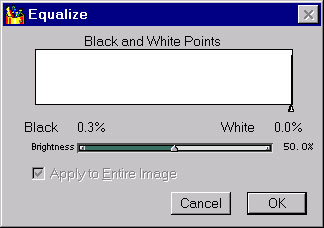
Fig. 11: Equalize [Painter]
|
 |
| |
Fig. 12: Offset [PhotoShop]
|
 |
Generating
Bump Maps
- Open Corel Painter.
- Open an existing color map file.
- Select Effects Tonal Controls Adjust
Colors. (Fig. 10)
- Drag Saturation level all the way to
the left (to remove color information)
and click OK.
- Select Effects Tonal Controls Equalize. (Fig.
11) and click OK (not necessary
to make changes). The image will be
black & white with a different
contrast level than color map.
- Save a copy of this file with "BUMP" appended
to the name, also in .tga format
(IMPORTANT: keep the original
color map file unchanged).
Cleaning
Up Final Textures
- Open PhotoShop.
- Open the final render .tga of
your LightWave® texture.
- Select Filter Other Offset. (Fig.
12)
- Set the Horizontal and/or Vertical pixel
offsets (depending upon tiling requirements)
to a number that is exactly one-half
the pixel dimensions of the current document
(i.e., if the document is 512, offset
to 256).
- Turn on the Wrap Around setting
under Undefined Areas and click OK.
- Clean up segment divisions with the
Cloning tool (alt-click on the
area to use for cloning) and other appropriate
tools.
- When cleanup is complete, check by
offsetting the image again (steps #3-5)
and continue retouching as needed.
- After results are satisfactory, reset
the offset parameters (optional).
- Save a copy of the final retouched
file in .tga format.
- Check the overall tiling effect of
the texture by applying it to a simple
surface in Modeler.
|
|
|
|
|
|
|
|

 For Fans Of CGI/Digital Art
|
|
|